
The Classic Fridge Manual
You’re a few steps away from a cheers.
Save these instructions
Please read and keep these instructions handy. They contain a lot of important information about your Classic Fridge. From setting it up to how to take care of it, this booklet will help you learn to use your fridge properly so that you can enjoy it with friends and family for years to come.
Tips & tricks for using your new favorite fridge
- Don’t plug your fridge in for 24 hours. It needs time to settle. (Good things come to those who wait!)
- In case you haven’t found them yet, the legs are in the trays. Take them out, then place the recyclable foam on the floor behind the fridge like a pillow, then put the fridge on its back on top of the foam to screw them in.
- Download the app, Rocco Fridge, from the Apple App Store. It’s not yet available for Android — coming soon. You’ll be able to see inside your fridge from your phone so you know if you’ve run out of your favorite drink when you’re at the grocery store.
- You can also control the temperature and set the cool down mode straight from the app, no matter where you are. There are multiple cool down modes depending on how fast you want your drinks chilled and how quiet you want your fridge to be.
- Move ALL of your drinks out of your kitchen fridge and into your new Rocco fridge. It’s designed to hold wine, beer, soda, seltzer, kombucha, cold brew, you get it… just not milk or perishables.
- The racks are reversible. The side with less space between the bars is for 12 oz cans, soda bottles, beer bottles, and other smaller drinks. The side with more space between the bars is for wine and Champagne. Some beer bottles and those skinny cans also fit well on that side too. Mix and match to your heart’s content.
- The shelf at the bottom of your fridge is a half size. Throw the bottles you’re saving for a special occasion down there and keep the stuff you drink daily at the top.
- Every Rocco fridge comes with a deck of cards that double as coasters. Your new fridge is basically like a bar in your living room. Invite family and friends over and use the cards to play anything but solitaire.
Setting up your Rocco
Important setup information
The Rocco Classic Fridge is factory set for a 97° door swing. Allow 5" min. clearance on the hinge side for the 90° door swing and to allow racks to slide out.
- Do not install the appliance where the temperature will go below 55°F (13°C) because it will not run often enough to maintain proper temperatures.
- Do not install the appliance where the temperature will go above 90°F (32°C) because it will not perform properly and could damage the unit.
- Do not install the appliance in a location exposed to water (rain, etc.) or direct sunlight.
- These products are not designed to be stacked.
- A 120 volt 60Hz., 15 or 20 amp power supply is required.
- An individual properly grounded branch circuit or circuit breaker is recommended.
NOTE: GFI (ground fault interrupter) is not recommended.
For personal safety, this appliance must be properly grounded. The power cord of this appliance is equipped with a three-prong (grounding) plug which mates with a standard three-prong (grounding) wall receptacle to minimize the possibility of electric shock hazard from this appliance.
Have the wall outlet and circuit checked by a qualified electrician to make sure the outlet is properly grounded. Where a standard 2-prong wall outlet is encountered, it is your personal responsibility and obligation to have it replaced with a properly grounded 3-prong wall outlet.
Do not, under any circumstances, cut or remove the third (ground) prong from the power cord. Do not use an adapter plug to connect the appliance to a 2-prong outlet. Do not use an extension cord with this appliance.
Step-by-step setup instructions for your Rocco Classic Fridge:
- Slide off the plastic straps outside the box. If you think you may want to return it, please do not cut the straps – they must be added back on the box. Wiggle them from the bottom and top.
- Slide the outer carton up and over the top of the fridge.
- On top of the fridge you will find the top tray and instruction booklet. We have heard that sometimes the top of the box gets stuck in the outer carton! If you can’t see your tray, dig inside the box and you’ll find it.
- Remove the edge protectors and carefully slide the protective bag off the fridge.
- Remove the tape across the door and remove the vertical cardboard strips.
- Remove the horizontal pieces of cardboard. These can be very tight to protect the glass door. They come out easily if you use one of the other corner protectors to pry open the door.
- Open the door and remove all the recyclable foam. In the foam you’ll find the legs, playing cards, and the door handle screws.
- Place two pieces of foam behind the fridge and then tilt the fridge backwards onto the foam. This will give you the angle you need to screw on the legs.
- Screw in all the legs, remove any remaining packaging, tilt it back up onto its feet, and move the fridge into place! Twist the legs as needed to ensure the fridge is level with any uneven floor. For NSF-7 commercial usage, twist the legs in the entire way so there is no exposed thread.
- Wait 24 hours, then plug it in!
Attaching the door handle:
- Remove the door handle from the side of the fridge, the screws, and the hex key that were with the instruction manual.
- On the inside of the fridge door there is a rubber seal. Remove this in the corners behind where the door handle goes. Protip: Don’t start in the corner, it’s really tight. The rubber pulls very easily from approximately 3” away from the corner.
- Insert the door handle on the front side of the door, and attach a screw through the hole behind the rubber.
- Tighten both screws until the handle does not wobble.
- Press the rubber firmly back in place. Tip: same as removing the rubber, it’s easiest to start away from the corners and push towards the corner.
If you have any questions, please email us at hi@roccofridge.com.
Connecting to wifi
Connect your Classic Fridge to remotely monitor and control it.
Connecting requires:
- Wireless router
- Internet connection with a network name and password
- Compatible mobile device
There is no limit to the number of fridges you can connect to an account. Connect fridges from multiple homes to the same account.
Connecting your fridge is optional, but recommended.
Connect today to:
- Receive alerts and status updates.
- Streamline everyday tasks with the help of remote controls and voice commands.
To connect:
- Download the Rocco Fridge app, available on the Apple App Store.
- Press and hold the wifi reset button for 3 seconds on your fridge to enter setup mode.
- Open the Rocco Fridge app and follow the on-screen prompts.
P.S. Keep in mind, after 15 minutes setup mode is automatically turned off, so make sure you press and hold the wifi reset button again if needed.
If you want to disconnect the wifi, press and hold the wifi reset button for 3 seconds on your fridge.
Rocco Features
Adjustable Shelves
All full size shelves in the Rocco Classic Fridge are removable. The second and fourth shelves are also adjustable, to be able to fit different drink types. The half size shelf at the very bottom is not adjustable.
Here’s how you adjust them: To remove a shelf, open the door completely. Remove the wire rack. Then unscrew the two hand screws at the rear of the metal tray (don’t lose them!). Lift the wire racks out. Remove the side railings from the tracks along the sides of the cabinet. Repeat this process in reverse to secure them in the new position.

Reversible Shelves
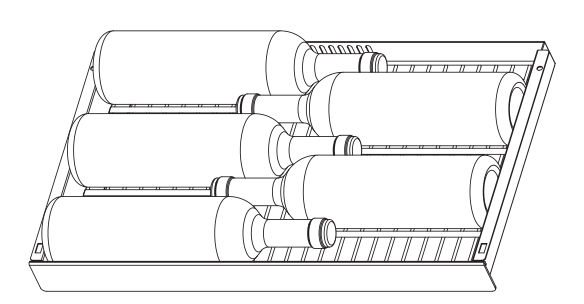
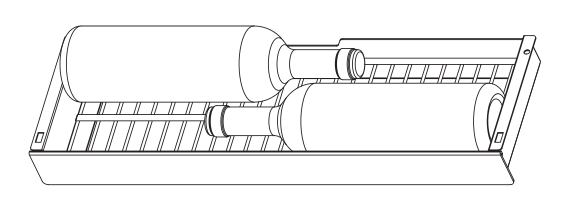
This side of the shelf with the bigger bars: Store all size wine bottles and slim cans (e.g. Ghia, White Claw, Red Bull).
This side of the shelf with the smaller bars: Store all other drinks (e.g. classic size La Croix or Coke can, classic beer bottle, and more).
Mix and match within your fridge based on your favorite drinks.
Recommended shelf configurations
| Shelf | Largest bottle that fits | Everything else that fits too | |
|---|---|---|---|
| 1 | Champagne Use side with the thicker racks | Bordeaux or Pinot Use side with the thicker racks | Soda and beer Use side with the thinner racks |
| 2 | Pinot Use side with the thicker racks | Bordeaux Use side with the thicker racks | Soda and beer Use side with the thinner racks |
| 3 | Bordeaux Use side with the thicker racks | Pinot Use side with the thicker racks | Soda and beer Use side with the thinner racks |
| Control Panel | |||
| 4 | Pinot Use side with the thicker racks | Bordeaux Use side with the thicker racks | Soda and beer Use side with the thinner racks |
| 5 | Bordeaux Use side with the thicker racks | Soda and beer Use side with the thinner racks | |
| 6 | Bordeaux Use side with the thicker racks | Soda and beer Use side with the thinner racks | |
| Shelf | Largest bottle that fits | Everything else that fits too | |
|---|---|---|---|
| 1 | Champagne Use side with the thicker racks | Bordeaux or Pinot Use side with the thicker racks | Soda and beer Use side with the thinner racks |
| 2 | Soda and beer Use side with the thinner racks | ||
| 3 | Pinot Use side with the thicker racks | Bordeaux Use side with the thicker racks | Soda and beer Use side with the thinner racks |
| Control Panel | |||
| 4 | Soda and beer Use side with the thinner racks | ||
| 5 | Champagne Use side with the thicker racks | Bordeaux or Pinot Use side with the thicker racks | Soda and beer Use side with the thinner racks |
| 6 | Bordeaux Use side with the thicker racks | Soda and beer Use side with the thinner racks | |
Controls & Features
- Your Rocco Classic Fridge has two temperature zones. The operating temperature of the lower zone is from 41°F (5°C) to 61°F (16°C).The upper zone operating temperature is from 37°F (3°C) to 55°F (13°C).
- The lower zone must be warmer than the upper zone.
- It’s designed for storing and cooling beverages. It is not intended for storage of perishable foods or perishable drinks (e.g., milk).
- As with any refrigeration-type product, there is a slight temperature variance at different locations.
- Do not install it in a location where the ambient temperature will go below 55°F (13°C) or above 90°F (32°C).
Control Panel
-
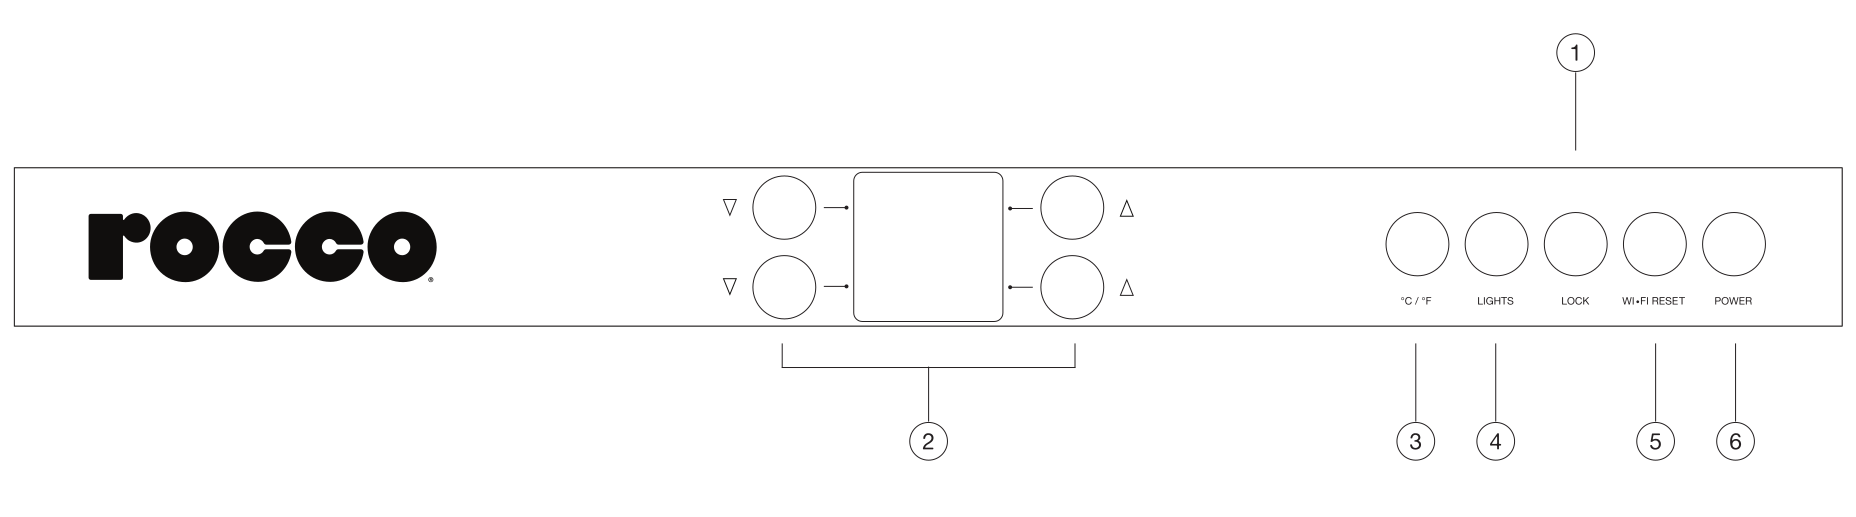
1
Locking/Unlocking Control Panel:
Your control panel can be locked. If it’s been locked, press the Lock button for 4 seconds until the display flashes. You can always press and hold Lock button to lock/unlock the control panel.
-
2
UP and DOWN to Change Temperature Setting:
Press the DOWN key or the UP key once to enter temperature setting change mode. The display will start to flash the current temperature setting. Press the DOWN key or UP key again to decrease or increase the desired temperature in increments of one degree. If no key is pressed in 3 seconds, the display will stop flashing, and your change will be automatically accepted. When temperature setting is changed, allow 8 hours for the unit to stabilize.
-
3
Fahrenheit and Celsius:
Press °C / °F button to switch between Fahrenheit and Celsius temperature display.
-
4
Interior Lights:
To switch the interior light on/off, simply press LIGHTS. The display will flash ON or OFF in this process. When light setting is ON, interior light is always on. When light setting is OFF, the interior light turns on when door is opened, and turns off when door is closed.
-
5
WI•FI/RESET:
Press and hold Wi-Fi/Reset for 3 seconds to enter wifi pairing mode. (See Connecting to wifi for pairing instructions.)
-
6
POWER:
To power off the drinks fridge, press and hold the lock button, then press and hold the power key for 3 seconds. To power on, press and hold the power key for 3 seconds.
Door Alarm: If door is left open for more than 2 minutes, the door alarm will sound until door is closed. The door alarm can be turned off by pressing and holding Light for 10 seconds.
How to Care & Clean
Unplug the Rocco Classic Fridge before cleaning.
Cleaning Outside Surfaces, Door Handles, and Trim
Do use:
Soft, clean cloth or sponge
Do not use:
- Abrasive cloths, scrubbing sponges, scouring or steel wool pads
- Abrasive powders or sprays
- Window Sprays or Ammonia Citrus or plant oil-based cleaners Acidic or vinegar-based cleaners Oven cleaners
- Cleaners containing acetone (propanone) or any cleaner with a warning about plastic contact
Note: Do not allow steel cleaner to come in contact with any plastic parts such as trim pieces, handle hardware and liners. If unintentional contact of cleaners with plastic parts does occur, clean plastic part with a sponge and mild detergent mixed with warm water.
Cleaning the Inside
The door gasket may be cleaned with mild soap and water or a baking soda solution. Rinse well. After cleaning the door gasket, apply a thin layer of paraffin wax or petroleum jelly to the door gasket at the hinge side. This helps keep the gasket from sticking and bending out of shape.
Use a slightly damp cloth or sponge when cleaning around lights or controls.
Use warm water and baking soda solution-about a tablespoon (15 ml) of baking soda to a quart (1 liter) of water. This both cleans and neutralizes odors. Thoroughly rinse and wipe dry.
Other parts of the appliance including the shelves can be cleaned the same way.
Do not use detergents, scouring powders, spray cleaners or other harsh chemicals to clean the interior.
Proper disposal of your Rocco
Failure to follow these disposal instructions can result in death or serious injury
Important: Child entrapment and suffocation are not problems of the past. Junked or abandoned appliances or freezers are still dangerous even if they will sit for “just a few days.” If you are getting rid of your old appliance, please follow the instructions below to help prevent accidents.
Before you throw it away, take off the door, and leave the shelves in place so that children may not easily climb inside.
Refrigerant and Foam Disposal: Dispose of appliance in accordance with Federal and Local Regulations. Flammable refrigerant and insulation material used require special disposal procedures. Contact your local authorities for the environmentally safe disposal of your appliance.
Safe Installation Information
Read ALL instructions before using.
Keep flammable materials and vapors away from appliance. Failure to do so can result in fire, explosion, or death.
This appliance contains isobutane refrigerant, also known as R600a, a natural gas with high environmental compatibility. However, it is also combustible. Adhere to the warnings below to reduce the risk of injury or property damage.
- When handling, installing and operating the appliance, care should be taken to avoid damage to the refrigerant tubing.
- Service shall only be performed by authorized service personnel. Use only manufacturer authorized service parts.
- Dispose of appliance in accordance with the Federal and Local Regulations. The flammable refrigerant and insulation material used in this product require special disposal procedures. Contact your local authorities for the environmentally safe disposal of your appliance.
- Keep ventilation openings in the appliance enclosures or in the built-in structure clear of obstruction.
- To remove frost, scrape with a plastic or wood spatula or scraper. Do not use an ice pick or a metal or sharp-edged instrument as it may puncture the appliance liner and then the flammable refrigerant tubing behind it.
- Do not use electrical appliances inside the storage compartment of the appliance.
- Do not use any electrical device to defrost your appliance.
Connecting Electricity
- Plug into a grounded 3-prong outlet.
- Do not remove the ground prong.
- Do not use an adapter.
- Do not use an extension cord with this appliance.
- Failure to follow these instructions can result in death, fire, or electrical shock.
- Do not, under any circumstances, cut or remove the third (ground) prong from the power cord. For personal safety, this appliance must be properly grounded.
- The power cord of this appliance is equipped with a 3-prong (grounding) plug which mates with a standard 3-prong (grounding) wall outlet to minimize the possibility of electric shock hazard from this appliance.
- Have the wall outlet and circuit checked by a qualified electrician to make sure the outlet is properly grounded.
- If you have only a standard 2-prong wall outlet, it is your personal responsibility and obligation to have it replaced with a properly grounded 3-prong wall outlet.
- Note: GFI (ground fault interrupter) is not recommended.
- The appliance should always be plugged into its own individual electrical outlet which has a voltage rating that matches the rating plate.
- This provides the best performance and also prevents overloading house wiring circuits which could cause a fire hazard from overheated wires.
- Never unplug your appliance by pulling on the power cord. Always grip plug firmly and pull straight out from the outlet.
- Immediately discontinue use of a damaged power cord. If the power cord is damaged, it must be replaced by a qualified service professional with an authorized service part from the manufacturer. When moving the appliance away from the wall, be careful not to roll over or damage the power cord.
Important Safety Information
NSF/ANSI Standard 7 compliant. This equipment is intended for the storage and display of bottled or canned products that are considered “non-time / temperature control for safety foods.”
- Use this appliance only for its intended purpose as described in this Owner’s Manual.
- This appliance must be properly installed and located in accordance with the Installation Instructions before it is used.
- Unplug the appliance before making repairs or cleaning. Note: Power to the appliance cannot be disconnected by any setting on the control panel. Note: Repairs must be performed by a qualified Service Professional.
- Replace all parts and panels before operating.
- Do not store or use gasoline or other flammable vapors and liquids in the vicinity of this or any other appliance.
- Do not store explosive substances such as aerosol cans with a flammable propellant in this appliance.
- Do not use an extension cord.
- To prevent suffocation and entrapment hazards to children, remove door from this appliance before disposing of it or discontinuing its use.
- To avoid serious injury or death, children should not stand on, or play in or with the appliance.
- Children and persons with reduced physical, sensory or mental capabilities or lack of experience and knowledge can use this appliance only if they are supervised or have been given instructions on safe use and understand the hazards involved.
- Do not apply harsh cleaners to the appliance. Certain cleaners will damage plastic and metal finish which may cause parts such as the door or door handles to detach unexpectedly. See the Care and Cleaning section for detailed instructions.
- If a light breaks or is obstructed and you don’t repair it, it will impair the functioning of the vision system.
Warning: To reduce the risk of injury when using your appliance, follow these basic safety precautions:
- Do not clean glass door with warm water when it is cold. Glass door may break if exposed to sudden temperature changes or impact, such as bumping or dropping. Tempered glass is designed to shatter into many small pieces if it breaks.
- Keep fingers out of the “pinch point” areas; clearances between the doors and between the doors and cabinet are necessarily small. Be careful closing doors when children are in the area.
- This unit is designed for storing and cooling beverages. Do not store perishable foods or perishable drinks (e.g., milk) in your Classic Fridge.
Troubleshooting Tips
Before you get in touch, check out the tips below. If you still need help, feel free to email us at hi@roccofridge.com and we’ll get back to you ASAP.
| Problem | Possible Causes | What To Do |
|---|---|---|
| It’s not operating |
|
|
| Vibration or rattling (slight vibration is normal) | It is on an uneven surface. | Adjust the leveling legs as shown in the Installation Instructions. |
| Motor operates for long periods or cycles on and off frequently |
|
|
| Compartment too warm |
|
|
| It has an odor | Interior needs cleaning. |
See Care and cleaning. Keep open box of baking soda in it; replace every 3 months. |
| Door not closing properly |
|
|
| Moisture forms on the outside |
|
|
| Frost or moisture collects inside |
|
|
| Interior light does not work |
|
|
| Hot air coming from the bottom | Normal air flow cooling motor. | In the refrigeration process, it is normal for heat to be expelled in the area under the appliance. Some floor coverings are sensitive and will discolor at these safe and normal temperatures. |
| It never shuts off |
|
|
Rocco Classic Fridge Product Warranty
EFFECTIVE DATE: SEPTEMBER 21, 2024
LENGTH OF WARRANTY:
This Warranty applies for the following time periods, beginning on the date of your original purchase of a Rocco Classic Fridge (formerly the Super Smart Fridge) (the “Product”):
- 30 Days for cosmetic defects
- 2 Years for defects in materials or workmanship
- 4 Years for sealed system defects (parts and labor)
- 10 Years extended warranty for sealed system defects (parts only and only for residential usage)
LIMITED 30 DAY COSMETIC WARRANTY
The Product’s cabinet sides and top, doors, handles, and shelves will be free from cosmetic defects for a period of thirty (30) days from the date of original purchase of the Product. Any such cosmetic defects must be reported to Rocco within thirty (30) days from the date of original purchase.
2-YEAR MATERIALS OR WORKMANSHIP WARRANTY:
All parts of the Product will be free from defects in materials and workmanship under normal and proper use and maintenance as specified by Rocco and upon proper installation and start-up in accordance with the instruction manual supplied with each new Product and/or available on www.roccofridge.com for a period of two (2) years from the date of original purchase. Any such defects must be reported to Rocco within two (2) years from the date of original purchase.
During the 2-year warranty period, Rocco will, in its sole discretion, repair or replace any defective parts of the Product. In the event Rocco determines in its sole discretion that it cannot repair or replace any such defective parts, Rocco will use the value of your original order toward a replacement Product. In any such event, the warranty applicable to the replacement Product will apply for the remaining term of the original Product’s warranty period. All repairs provided by Rocco under this warranty must be performed by Rocco’s authorized service providers unless otherwise specifically agreed to by Rocco. Any such repairs will be provided during normal business hours.
4-YEAR SEALED SYSTEM WARRANTY (PARTS & LABOR):
The Product’s hermetically sealed refrigeration system (consisting of the compressor, evaporator coil, condenser coil, drier, metering device and connecting tubing) will be free from defects in both materials and workmanship under normal and proper use and maintenance as specified by Rocco and upon proper installation and start-up in accordance with the instruction manual supplied with each new Product and/or available on www.roccofridge.com for a period of four (4) years from the date of original purchase. Any such defects must be reported to Rocco within four (4) years from the date of original purchase.
During the 4-year warranty period, Rocco will, in its sole discretion, repair or replace any defective parts of the hermetically sealed refrigeration system. In the event Rocco determines in its sole discretion that it cannot repair or replace any such defective parts, Rocco will use the value of your original order toward a replacement Product. In any such event, the warranty applicable to the replacement Product will apply for the remaining term of the original Product’s warranty period. All repairs provided by Rocco under this warranty must be performed by Rocco’s authorized service providers unless otherwise specifically agreed to by Rocco. Any such repairs will be provided during normal business hours.
10-YEAR SEALED SYSTEM EXTENDED WARRANTY (PARTS ONLY AND ONLY FOR RESIDENTIAL USAGE):
For Products purchased after September 10, 2024 and registered via the Product Registration Page available on www.roccofridge.com, the Product’s hermetically sealed refrigeration system (consisting of the compressor, evaporator coil, condenser coil, drier, metering device and connecting tubing) will be free from defects in both materials and workmanship under normal and proper use and maintenance as specified by Rocco and upon proper installation and start-up in accordance with the instruction manual supplied with each new Product and/or available on www.roccofridge.com for a period of ten (10) years from the date of original purchase. The Product must be registered online via Rocco’s Product Registration Page within sixty (60) days of original purchase in order to be covered under this 10-year extended warranty.
During the 10-year warranty period, Rocco will replace, but will not repair, any defective parts of the hermetically sealed refrigeration system. Rocco will be responsible for all shipping and handling costs with respect to replacement parts. Any replacement parts will be free from defects for the remaining term of the original warranty period. All defective parts must be returned to Rocco upon Rocco’s request (and at Rocco’s expense). This 10-year extended warranty is only available for residential usage and not for commercial usage.
WHO IS COVERED BY THIS WARRANTY:
This Warranty applies to Products purchased and used within the contiguous United States (excluding, for the avoidance of doubt, Alaska and Hawaii) and the District of Columbia. This Warranty applies to the original purchaser of the Product during the applicable warranty period, provided that such purchaser can present appropriate proof of original purchase.
HOW TO MAKE A WARRANTY CLAIM:
- Before contacting Rocco to make a claim, please visit the “Troubleshooting” section of Rocco’s website for troubleshooting help.
- All repair services provided under this Warranty must be provided by Rocco’s authorized service providers. To request repair services, please contact the Rocco Customer Service team at hi@roccofridge.com
- All warranty claims for repair services or replacement parts must be made directly through Rocco. All claims must include: the model number and the serial number listed on the back of the Product’s cabinet; proof of original purchase; the date of installation; the original email address used to purchase the Product (if applicable); and a clear and detailed description (including photos and/or videos) of the applicable defect. In the case of a defective compressor, the compressor model tag must be returned to Rocco along with the other information listed in this Section 3.
LIMITATIONS OF THIS WARRANTY:
Rocco’s sole and exclusive obligations under this Warranty are limited to the repair and replacement obligations expressly set forth herein, subject to the additional limitations set forth below. Rocco’s total liability for any defective Product shall under no circumstances exceed the actual amount paid for the applicable defective Product.
NO CONSEQUENTIAL DAMAGES: To the fullest extent permitted by law, Rocco will not be liable or otherwise responsible for any special, indirect, incidental or consequential damages of any kind, including, without limitation, for economic loss or lost profits, or for any losses or damages arising from food, beverage, medicine or other product spoilage, damage to other property or damage caused by water leakage, whether or not caused by any failure of, or defect in, the Product.
DISCLAIMER OF IMPLIED WARRANTIES: Rocco disclaims all implied warranties, including, without limitation, the implied warranties of merchantability and fitness for a particular purpose, and only makes those warranties expressly set forth in this Warranty. Some jurisdictions do not allow the disclaimer of implied or other warranties, in which case this disclaimer of implied warranties may not apply to you.
WARRANTY IS NOT TRANSFERABLE: This Warranty is not transferrable or assignable and only applies to the original purchaser of the Product.
IMPROPER USAGE; ACTS OF GOD: This Warranty does not apply to damages to, defects in, or failure of the Product resulting from the improper use or installation of the Product or the failure to clean and/or maintain the Product as set forth in the Product’s instruction manual. This Warranty also does not apply to acts of God, including, without limitation, fire, flood or natural disaster, or any other cause beyond the reasonable control Rocco.
IMPROPER ELECTRICAL CONNECTIONS: This Warranty does not apply to damaged or defective Products or component parts resulting from electrical power failure, high or low voltage, use of extension cords, use of adapters or improper grounding of the Product.
LOCATION-SPECIFIC LIMITATIONS: If you are located in an area where Rocco’s authorized service providers are not available, then you may be responsible for applicable travel expenses or you may be required to bring the defective Product to one of Rocco’s authorized service locations at your own cost and expense.
WHAT IS NOT COVERED BY THIS WARRANTY:
The following are not covered by this Warranty:
- Use of the Product in violation of the Product’s instruction manual, including:
- Improper maintenance or installation of the Product
- Unauthorized service, alteration or modification of the Product
- Combination with third-party parts or accessories
- Damages or defects caused by electrical or plumbing failures
- Damages caused by freight or shipping carriers during the delivery of the Product; any such damages must be identified and reported to Rocco upon delivery of the Product along with proper evidence of any such damage
- Products with original serial numbers that have been removed or altered or that cannot be readily determined
- Products for which any defective parts are not returned to Rocco for inspection (if requested by Rocco)
- Repair, removal or re-installation of inaccessible Products or component parts (e.g., when household fixtures interfere with Rocco’s ability to service, remove or replace the applicable Product or component part)
- Signal issues related to Wi-Fi connectivity and camera performance
- Repairs or replacements of light bulbs, railings, batteries, air filters, water filters or preservation solutions
- Heavy commercial use (classified as opening and closing the Product’s door more than 30 times per day or more than 50,000 times over the life of the Product)
- Products used outdoors (unless the applicable Product was specifically designed for outdoor use, as indicated by the Product’s model and serial number) or otherwise in an environment consistent with an outdoor environment, including temperatures below 55°F (13°C) or above 82°F (28°C) or humidity above 70%.
- Used, refurbished, re-sold, showroom models or any other second-hand or non-original Products
Please Note
Changes or modifications to this unit not expressly approved by the party responsible for compliance could void the user’s authority to operate the equipment.
NOTE: This equipment has been tested and found to comply with the limits for a Class B digital device, pursuant to Part 15 of the FCC Rules.
These limits are designed to provide reasonable protection against harmful interference in a residential installation.
This equipment generates uses and can radiate radio frequency energy and, if not installed and used in accordance with the instructions, may cause harmful interference to radio communications.
However, there is no guarantee that interference will not occur in a particular installation.
If this equipment does cause harmful interference to radio or television reception, which can be determined by turning the equipment off and on, the user is encouraged to try to correct the interference by one or more of the following measures:
- Reorient or relocate the receiving antenna.
- Increase the separation between the equipment and receiver.
- Connect the equipment into an outlet on a circuit different from that to which the receiver is connected.
- Consult the dealer or an experienced radio/TV technician for help.
This equipment complies with FCC radiation exposure limits set forth for an uncontrolled environment. This equipment should be installed and operated with a minimum distance of 20cm between the radiator & your body. This transmitter must not be co-located or operating in conjunction with any other antenna or transmitter.
This device complies with Part 15 of the FCC Rules. Operation is subject to the following two conditions:
- This device may not cause harmful interference, and
- This device must accept any interference received, including interference that may cause undesired operation.
5150MHz-5250MHz is for indoor use only.
This device contains licence-exempt transmitter(s)/receiver(s) that comply with Innovation, Science and Economic Development (ISED) Canada’s licence exempt RSS(s). Operation is subject to the following two conditions:
- This device may not cause interference, and
- this device must accept any interference, including interference that may cause undesired operation of the device.
The device has been evaluated to meet general RF exposure requirement. The distance between user and products should be no less than 20cm.
L’émetteur/récepteur exempt de licence contenu dans le présent appareil est conforme aux CNR d’Innovation, Sciences et Développement économique Canada applicables aux appareils radio exempts de licence.
L’exploitation est autorisée aux deux conditions suivantes :
- L’appareil ne doit pas produire de brouillage;
- L’appareil doit accepter tout brouillage radioélectrique subi, même si le brouillage est susceptible d’en compromettre le fonctionnement.
L’appareil a été évalué pour répondre aux exigences générales d’exposition aux RF. La distance entre l’utilisateur et les produits devraient être au moins 20 cm.