
The Essential Fridge Manual
You’re a few steps away from a cheers.
Save these instructions
Please read and keep these instructions handy. They contain a lot of important information about your Rocco Essential Fridge. From setting it up to how to take care of it, this booklet will help you learn to use your fridge properly so that you can enjoy it with friends and family for years to come.
If you have any questions, please email us at hi@roccofridge.com.
For setup troubleshooting, first visit the FAQs section on our site.
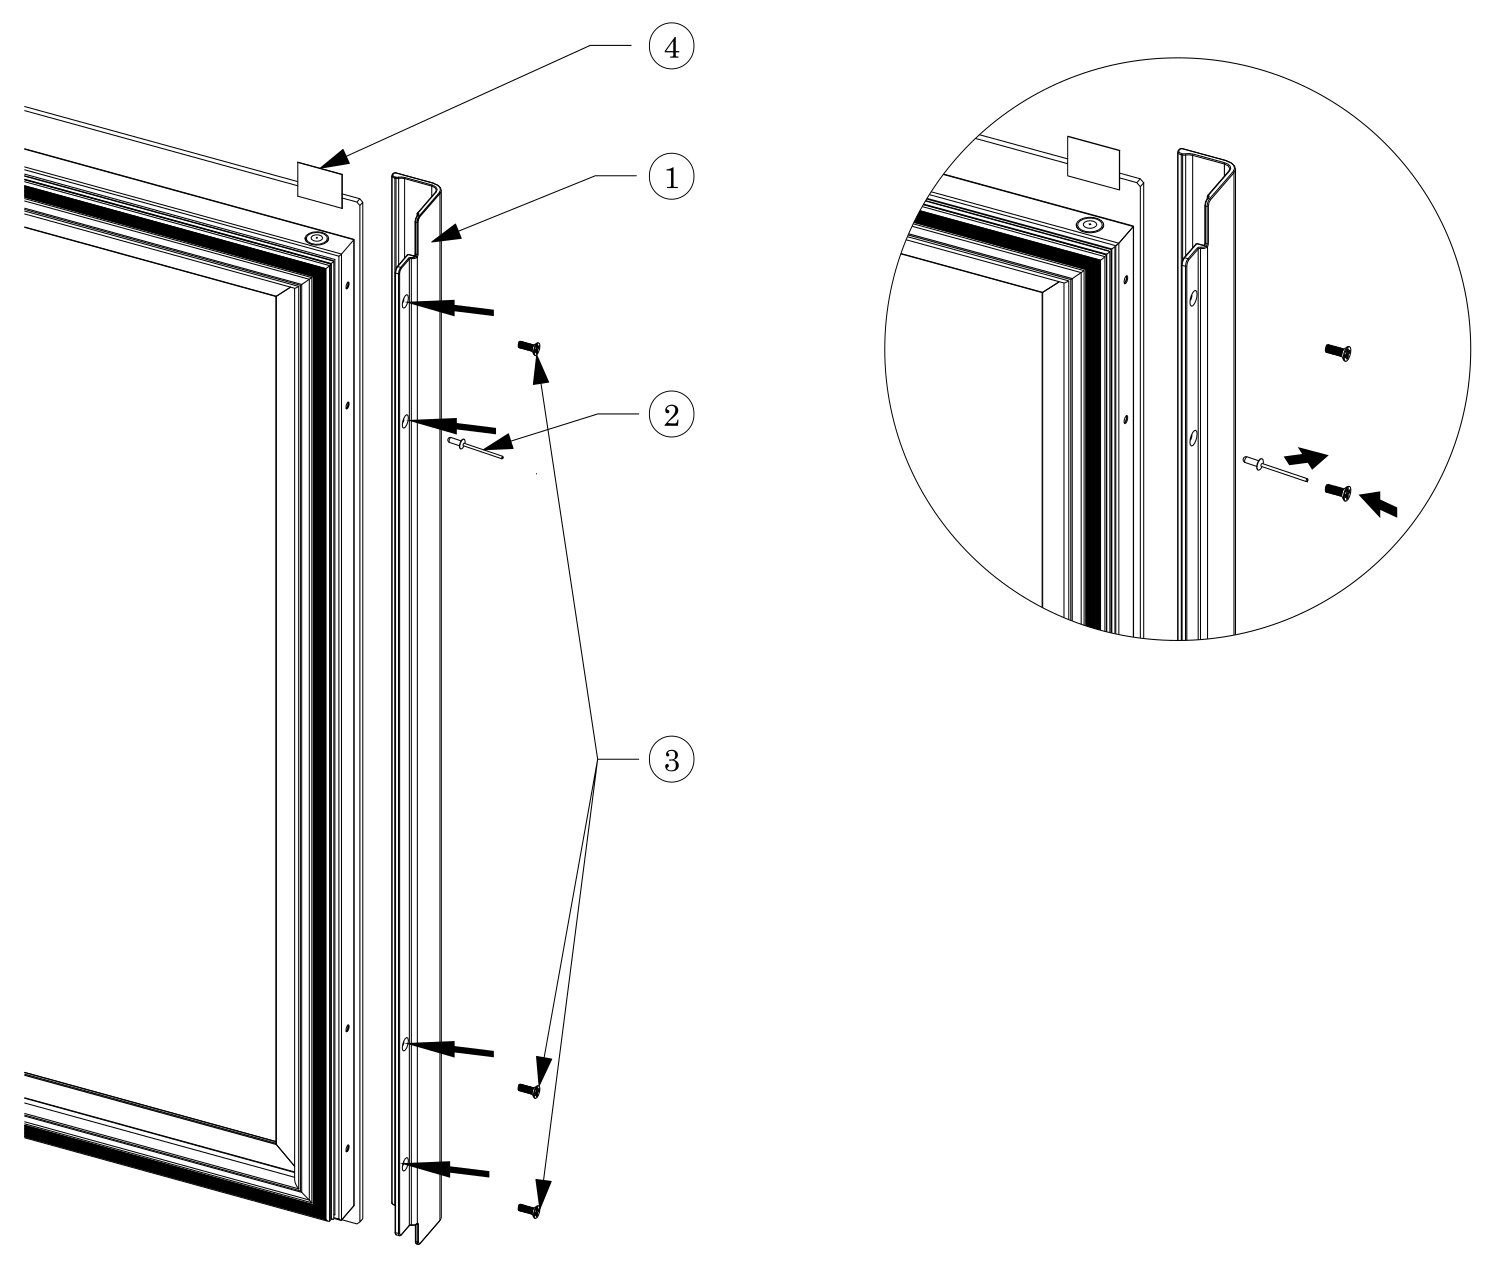
Handle Installation Guide
We have provided a metal guide pin to hold the door in place for easier assembly.
- Place the Handle ① onto the door in the direction shown in the illustration.
- Insert the guide pin ② in the second hole down to secure the handle.
- Secure the handle by inserting and tightening three enclosed screws ③ using the screwdriver.
- Remove the guide pin ② and the temporary tape ④ then insert and tighten the 4th provided screw in the remaining hole.
CAUTION: Take care to prevent parts from falling during assembly.
Tips & tricks for using your new favorite fridge
-
Don’t plug your fridge in for 24 hours. The refrigerant needs time to settle if the fridge has been tumbled in transit. (Good things come to those who wait!).
Good news: If the white glove team did the install, no need to wait!
-
Download the app: It’s called Rocco Fridge and you can find it in the Apple App Store. We don’t have an Android version at this time.
- You’ll be able to see inside your fridge when you’re at the grocery store stocking up. It’ll show exactly which drinks you have.
- You can also use it to control the temperature, lights, and cooldown and noise levels.
- In the app, you’ll see there are multiple cool down modes depending on how fast you want your drinks chilled and how quiet you want your fridge to be.
- Move all your drinks out of your kitchen fridge and into your Rocco. Wine, beer, soda, seltzer, kombucha, cold brew – you get it. Just skip the milk, perishables, medicine, and anything else that needs ultra rapid cooling.
- Our uniquely designed shelves make for a choose-your-own-adventure. Most cans and smaller drinks can fit either way (Think: Tetris), but we like to place them perpendicular to the front bar. Wine bottles should sit parallel to it. And when you’re loading cans or smaller bottles, start on the left side of the shelf.
- With our adjustable height railing system, you can move shelves up and down. If you want to fit a lot of bigger bottles, like Champagne, we recommend removing a shelf.
Setting up your Rocco
UNBOXING
-
Move the refrigerator to the desired location.
Tip: The box is heavy and may have gravel or grit from transportation underneath it. Be sure to protect your floors before sliding the box around.
- Slide off the plastic straps outside the box. If you think you may want to return it, please do not cut the straps – they must be added back on the box. Wiggle them from the bottom and top.
- Slide the outer carton up and over the top of the fridge.
- The instruction manual and handle installation parts are located on the top shelf inside the fridge.
- Remove the door handle secured to the rear side corner.
- Slide the protective bag off the fridge.
- Take the fridge out of its packaging by either having two people lift it, or tilting it backwards onto a piece of foam, then removing the base cover.
- If the floor is uneven, adjust the underside leveling legs by turning them until the refrigerator is stable.
- Remove the tape securing the door and open the door.
- Using a Phillips-head screwdriver and the four included screws, attach the handle to the left side of the door.
- Wait 24 hours, then plug it in!
SPECS
| Effective volume | 3.53 Cu Ft |
|---|---|
| Overall Dimensions (WxHxD) | 23 13/16" × 34 7/16" × 15 3/4" (17 1/8" with Door Handle) |
| Installation Space (WxHxD) | 24" × 34 9/16" × 16 1/16" |
| Door Opening Angle | 95˚ |
| Electrical Supply | AC 115V / 1.5A / 60Hz |
| Refrigeration | Compressor |
| Refrigerant | R-600a |
| Refrigerant Charging Amount | 26g |
| Product Weight | NET : 50Kg / GROSS : 54Kg |
PLACEMENT
Do not install it where the temperature will go below 55°F (13°C) or above 90°F (32°C). It will not perform properly and could damage the unit.
Do not install it in a location exposed to water or direct sunlight.
The Rocco is not designed to be stacked.
The Rocco can be placed flush against baseboard.
CONNECTING THE APP TO YOUR FRIDGE
Download the app and connect to remotely control your fridge and see the drinks inside.
- Wireless router
- Internet connection with a network name and password
- Compatible mobile device
- The Fridge to be in a location with strong wireless signal
There is no limit to the number of fridges you can connect to an account. Connect fridges from multiple homes to the same account.
To connect:
- Download the Rocco app, available on the Apple App Store.
- Open the Rocco Fridge app and follow the on-screen prompts.
Rocco features
Here are some of our favorite features:

-
Control panel where you can adjust the temperature and other settings
-
Shelves where you can store everything from wine to soda
-
Railing system that lets you adjust shelf heights to fit drinks of every size, including Champagne bottles
-
Lock so you can keep kids (or anyone!) out
-
World-class compressor so the fridge stays cold and quiet
Adjusting or Removing Shelves
All full-size shelves in the Essential Fridge are height adjustable and removable to fit any type of beverage.
Detach the shelf:
- Fully and extend the shelf.
- Grip the metal railing tabs under the front corners and pull horizontally away from the shelf.
- Pull the shelf forward and slightly upward to detach it from the rails.
Remove the railings:
- Fully close the railing.
- In a single motion, pull the underside of the railing toward the cabinet interior, then downward.
Attach the railings:
- Insert the top tab of the railing into the bracket (Tip: Align using the interior semicircles to check that the front and back are aligned).
- Push the bottom side down until the lower tab clicks into place.
- Reattach the shelf by following the removal steps in reverse.
Fitting your drinks
All shelves have a grip and fit system:
- Wine and champagne bottles go parallel to the front bar.
- All other cans and bottles can be arranged as you like.
- If you’re putting can bases against the front bar, start filling on the left and fit 7 regular 12 oz soda cans, 8 skinny cans (i.e. White Claw) or 9 mini cans (i.e. Fever Tree) on each row.
Note:
- This fridge has a single temperature zone that you can set between 34°F (1°C) to 57°F (14°C).
- Do not store perishable food or drinks, like milk.
- As with any refrigeration product, slight temperature variations may occur across different areas of the interior.
- The maximum loading for each shelf:
- Full shelf: 19 lbs
- Half shelf: 7 lbs




CONTROL PANEL
You can use the control panel to configure all functions of your appliance and to obtain information about the operating status.

-
Sets the temperature.
-
Display for temperature and other settings.
-
Switches the interior lighting on or off.
-
Select temperature to display in Fahrenheit or Celsius.
-
Change cooldown mode.
-
Toggle the control panel lock on or off.
-
Turns the fridge on or off.
Modes and Settings
-
Temperature Settings
- Range: 34°F (1°C) to 57°F (14°C).
- Adjust: Press + or – to enter setting mode (display flashes). Press +/– to adjust by 1° increments.
- Acceptance: Changes save automatically after 3 seconds of inactivity.
- Stabilization: Allow 8 hours for temperature to stabilize after adjustment.
-
Interior Lights
Press LIGHTS to toggle lights on and off.
- ON: Light stays on continuously.
- OFF: Light activates only when the door is opened.
- To adjust the interior lighting brightness, press and hold the LIGHTS button for 3 seconds until the display is flashing. Then, press the LIGHTS button to cycle through the available levels: “01” (Low), “02” (Medium), or “03” (High).
- When the door is open, the interior lighting will remain at maximum brightness regardless of the selected brightness level.
-
Cooldown Modes
Press MODE to cycle: Quiet → Party → Smart → Quiet.
- Quiet Mode: Cools down a little slower, but it’s ultra quiet
- Party Mode: Cools down fast after you open the door, perfect for when you are opening and closing the door a lot, but it is a little noisier.
- Smart Mode: Strikes a balance between the two.
Selected mode flashes for 3 seconds; settings are retained per mode.
When control buttons are pressed, they make a sound. Press and hold the MODE button for 3 seconds to turn the sounds on or off. “bOn” (Buzzer On) or “bOF” (Buzzer Off) will flash on the display.
-
Control Panel Lock/Unlock
- Lock: Press the Lock button briefly while unlocked. Display flashes “On” for 5 seconds.
- Unlock: Press and hold Lock for 3 seconds. Display flashes “Off” for 5 seconds.
-
Power
- Power Off: Press and hold Lock for three seconds, then press and hold Power for 3 seconds.
- Power On: Press and hold Power for 3 seconds.
-
Sabbath Mode
To enable Sabbath Mode, press and hold the Light and Mode buttons simultaneously for 3 seconds. The display will flash “SAb” and then “On”.
After 36 hours, Sabbath Mode will be automatically disabled. To disable it before then, press and hold the Light and Mode buttons simultaneously for 3 seconds until the display flashes “SAb” and then “Off”.
-
Door Alarm
- 2+ minutes open: Alarm will sound.
How to Care & Clean
Unplug the Rocco Essential Fridge before cleaning.
Cleaning Outside Surfaces, Handles, and Trim
Use:
A soft, clean cloth or sponge.
Do Not Use:
- Abrasive cloths, scrubbing sponges, scouring pads, or steel wool.
- Abrasive powders, sprays, window cleaners, or ammonia.
- Citrus, plant oil-based, acidic, or vinegar-based cleaners.
- Oven cleaners.
- Cleaners containing acetone or those warning against plastic contact.
Important Notes:
- Keep steel cleaners away from plastic trim, handles, and liners. If contact occurs, clean immediately with a sponge and warm, mild soapy water.
- Do not clean a cold glass door with warm water; sudden temperature changes can cause the tempered glass to shatter. Avoid impact, bumping, or dropping.
- If the fridge is left empty for long periods, switch it off, clean and dry it, and leave the door open to prevent mold from developing.
Cleaning the Inside
Clean the door gasket with mild soap and water or a baking soda solution, then rinse well. Apply a thin layer of paraffin wax or petroleum jelly to prevent sticking and deformation.
Use a slightly damp cloth or sponge to clean around lights or controls. For general cleaning, including shelves, use a solution of one tablespoon of baking soda per quart of water to clean and neutralize odors. Thoroughly rinse and dry all surfaces.
For odor control use an open container of baking soda and leave inside the fridge.
Proper Disposal of your Rocco
Failure to follow these disposal instructions can result in death or serious injury.
Refrigerant and Foam Disposal:
Dispose of appliance in accordance with Federal and Local Regulations.
Flammable refrigerant and insulation material used require special disposal procedures. Contact your local authorities for the environmentally safe disposal of your appliance.
Important: Child entrapment and suffocation are not problems of the past.
Junked or abandoned appliances or freezers are still dangerous even if they will sit for “just a few days.” If you are getting rid of your old appliance, please follow the instructions below to help prevent accidents.
Before you throw it away, take off the door, and leave the shelves in place so that children may not easily climb inside.
Important Safety Information
Read ALL instructions before using.
Keep flammable materials and vapors away from appliance. Failure to do so can result in fire, explosion, or death.
This appliance contains isobutane refrigerant, also known as R600a, a natural gas with high environmental compatibility. However, it is also combustible. Adhere to the warnings below to reduce the risk of injury or property damage.
- When handling, installing and operating the appliance, care should be taken to avoid damage to the refrigerant tubing.
- Service shall only be performed by authorized service personnel. Use only manufacturer authorized service parts.
- Keep ventilation openings in the appliance enclosures or in the built-in structure clear of obstruction.
- To remove frost, scrape with a plastic or wood spatula or scraper. Do not use an ice pick or a metal or sharp-edged instrument as it may puncture the appliance liner and then the flammable refrigerant tubing behind it. Do not use any electrical device to defrost your appliance.
- Do not use electrical appliances inside the storage compartment of the appliance.
- Avoid ignition sources. If a leak is suspected, disconnect power, ventilate the room for several minutes, and contact qualified service personnel.
- This fridge is to be installed in accordance with the Safety Standard for Refrigeration Systems, ANSI/ASHRAE 15.
This appliance requires a 115V, 60Hz, 15 or 20-amp power supply on an individual, properly grounded circuit. Failure to adhere to these requirements can result in fire, electric shock, or death.
Safety Guidelines:
- Power Supply: Use only a dedicated outlet that matches the appliance’s voltage rating to prevent circuit overloading. GFI (ground fault interrupter) outlets are not recommended.
- Prohibitions: Do not use extension cords or adapter plugs. Never remove or cut the grounding prong from the power cord.
- Electrical Safety: Ensure your wall outlet is properly grounded; if you only have a 2-prong outlet, contact a qualified electrician to replace it.
- Handling: Never unplug the unit by pulling the power cord; always grip the plug firmly. Do not roll over or damage the cord when moving the appliance.
- Maintenance: Immediately discontinue use if the power cord is damaged. If damaged, it must be replaced by the manufacturer, its service agent or similarly qualified persons in order to avoid a hazard.
- Repairs: Must be performed by a qualified professional using authorized service parts.
- Use appliance only for its intended purpose.
- Ensure proper installation before use.
- Unplug before cleaning or repairs; repairs must be performed by a qualified professional.
- Replace all parts and panels before operation.
- Do not store flammable liquids or explosive substances (e.g., aerosol cans) near or inside the appliance.
- Remove the door before disposing of the appliance to prevent child entrapment.
- This appliance is not intended for use by persons (including children) with reduced physical, sensory or mental capabilities, or lack of experience and knowledge, unless they have been given supervision or instruction concerning use of the appliance by a person responsible for their safety.
- Children should be supervised to ensure that they do not play with the appliance.
- Keep packaging materials out of reach of children.
- Ensure the power plug remains accessible.
- Do not touch compressor/rear metal components; some surfaces may be hot.
- Open one shelf/rack at a time; do not sit, stand, climb, or lean on the door or the shelves; do not allow children to climb on the shelves
- Do not apply harsh cleaners to the appliance. Certain cleaners will damage plastic and metal finish which may cause parts such as the door or door handles to detach unexpectedly. See the Care and Cleaning section for detailed instructions.
- If a light breaks or is obstructed and you don’t repair it, it will impair the functioning of the vision system.
- Glass door may break if exposed to sudden temperature changes or impact, such as bumping or dropping. Tempered glass is designed to shatter into many small pieces if it breaks.
- Keep fingers out of the “pinch point” areas; clearances between the doors and between the doors and cabinet are necessarily small. Be careful closing doors when children are in the area.
WARNING: This product may contain chemicals known to the State of California to cause cancer, birth defects, or other reproductive harm.
Troubleshooting Tips
Before you get in touch, check out the tips below. If you still need help, feel free to email us at hi@roccofridge.com and we’ll get back to you ASAP.
| Problem | Possible Causes | What To Do |
|---|---|---|
| It’s not operating |
|
|
| Vibration or rattling (slight vibration is normal) | It is on an uneven surface. | Move to a flat surface. |
| Motor operates for long periods or cycles on and off frequently |
|
|
| Compartment too warm |
|
|
| It has an odor | Interior needs cleaning. |
Reference Cleaning guide Keep open box of baking soda in it; replace every 3 months. |
| Door not closing properly |
|
|
| Moisture forms on the outside |
|
|
| Frost or moisture collects inside |
|
|
| Interior light does not work |
|
|
| Hot air coming from the bottom | Normal air flow from the cooling motor. | In the refrigeration process, it is normal for heat to be expelled in the area under the appliance. Some floor coverings are sensitive and will discolor at these safe and normal temperatures. |
| It never shuts off |
|
|
| Leveling leg will not thread into the cabinet |
|
|
| Handle is loose or cannot be tightened |
|
If the issue persists, contact hi@roccofridge.com. |
| Shelf is loose, wobbly, or does not slide smoothly |
|
If the issue persists, contact hi@roccofridge.com. |
| Unable to connect to Wi-Fi |
|
If the issue persists, contact hi@roccofridge.com. |
| Refrigerator does not appear in the app |
|
If the issue persists, contact hi@roccofridge.com. |
| Sight System is not updating or inventory is inaccurate |
|
|
Essential Fridge Product Warranty
EFFECTIVE DATE: AUGUST 12, 2026
SIGN UP FOR THE WARRANTY
If you have purchased a Rocco Essential Fridge, please sign up for the warranty at roccofridge.com.
LENGTH OF WARRANTY:
This Warranty applies for the following time periods, beginning on the date of your original purchase of a Rocco Essential Fridge (the “Product”):
- 30 Days for cosmetic defects
- 2 Years for defects in materials or workmanship, including the sealed system (parts and labor)
LIMITED 30 DAY COSMETIC WARRANTY
The Product’s cabinet sides and top, doors, handles, and shelves will be free from cosmetic defects for a period of thirty (30) days from the date of original purchase of the Product. Any such cosmetic defects must be reported to Rocco within thirty (30) days from the date of original purchase.
2-YEAR MATERIALS OR WORKMANSHIP WARRANTY (PARTS & LABOR):
All parts of the Product, including the hermetically sealed refrigeration system (consisting of the compressor, evaporator coil, condenser coil, drier, metering device and connecting tubing), will be free from defects in materials and workmanship under normal and proper use and maintenance as specified by Rocco and upon proper installation and start-up in accordance with the instruction manual supplied with each new Product and/or available on www.roccofridge.com for a period of two (2) years from the date of original purchase. Any such defects must be reported to Rocco within two (2) years from the date of original purchase.
During the 2-year warranty period, Rocco will, in its sole discretion, repair or replace any defective parts of the Product, including all parts and labor costs associated with such repair or replacement. The purchaser shall have no right to specify or demand a particular remedy, and Rocco's determination as to the appropriate remedy shall be final. Any replacement Product or part may, at Rocco's sole discretion, be new, refurbished, or of equivalent functionality and value. In the event Rocco determines in its sole discretion that it cannot repair or replace any such defective parts, Rocco may, in its sole discretion, elect to use the value of your original order toward a replacement Product in lieu of further repair. In any such event, the warranty applicable to the replacement Product will apply for the remaining term of the original Product’s warranty period. All repairs provided by Rocco under this warranty must be performed by Rocco’s authorized service providers unless otherwise specifically agreed to by Rocco. Any such repairs will be provided during normal business hours.
WHO IS COVERED BY THIS WARRANTY:
This Warranty applies to Products purchased and used within the contiguous United States (excluding, for the avoidance of doubt, Alaska and Hawaii) and the District of Columbia.
This Warranty applies to the original purchaser of the Product during the applicable warranty period, provided that such purchaser can present appropriate proof of original purchase.
HOW TO MAKE A WARRANTY CLAIM:
- Before contacting Rocco to make a claim, please visit the “Troubleshooting” section of Rocco’s website for troubleshooting help.
- All repair services provided under this Warranty must be provided by Rocco’s authorized service providers. To request repair services, please contact the Rocco Customer Service team at hi@roccofridge.com
- All warranty claims for repair services or replacement parts must be made directly through Rocco. All claims must include: the model number and the serial number listed on the back of the Product’s cabinet; proof of original purchase; the date of installation; the original email address used to purchase the Product (if applicable); and a clear and detailed description (including photos and/or videos) of the applicable defect. In the case of a defective compressor, the compressor model tag must be returned to Rocco along with the other information listed above.
LIMITATIONS OF THIS WARRANTY:
Rocco’s sole and exclusive obligations under this Warranty are limited to the repair and replacement obligations expressly set forth herein, subject to the additional limitations set forth below. Rocco’s total liability for any defective Product shall under no circumstances exceed the actual amount paid for the applicable defective Product.
NO CONSEQUENTIAL DAMAGES: To the fullest extent permitted by law, Rocco will not be liable or otherwise responsible for any special, indirect, incidental or consequential damages of any kind, including, without limitation, for economic loss or lost profits, or for any losses or damages arising from food, beverage, medicine or other product spoilage, damage to other property or damage caused by water leakage, whether or not caused by any failure of, or defect in, the Product.
DISCLAIMER OF IMPLIED WARRANTIES: Rocco disclaims all implied warranties, including, without limitation, the implied warranties of merchantability and fitness for a particular purpose, and only makes those warranties expressly set forth in this Warranty. Some jurisdictions do not allow the disclaimer of implied or other warranties, in which case this disclaimer of implied warranties may not apply to you.
WARRANTY IS NOT TRANSFERABLE: This Warranty is not transferable or assignable and only applies to the original purchaser of the Product.
IMPROPER USAGE; ACTS OF GOD: This Warranty does not apply to damages to, defects in, or failure of the Product resulting from the improper use or installation of the Product or the failure to clean and/or maintain the Product as set forth in the Product’s instruction manual. This Warranty also does not apply to acts of God, including, without limitation, fire, flood or natural disaster, or any other cause beyond the reasonable control of Rocco.
DUTY TO MITIGATE: Upon discovering any defect in or malfunction of the Product, the purchaser shall take all reasonable steps to prevent or minimize any resulting damage, including, without limitation, damage to contents of the Product and damage to surrounding property. Rocco shall have no liability for any damages that could have been reasonably avoided or mitigated by the purchaser.
IMPROPER ELECTRICAL CONNECTIONS: This Warranty does not apply to damaged or defective Products or component parts resulting from electrical power failure, high or low voltage, use of extension cords, use of adapters or improper grounding of the Product.
LOCATION-SPECIFIC LIMITATIONS: If you are located in an area where Rocco’s authorized service providers are not available, then you may be responsible for applicable travel expenses or you may be required to bring the defective Product to one of Rocco’s authorized service locations at your own cost and expense.
WHAT IS NOT COVERED BY THIS WARRANTY:
The following are not covered by this Warranty:
Use of the Product in violation of the Product’s instruction manual, including:
- Improper maintenance or installation of the Product
- Unauthorized service, alteration or modification of the Product
- Combination with third-party parts or accessories
- Damages or defects caused by electrical or plumbing failures
- Damages caused by freight or shipping carriers during the delivery of the Product; any such damages must be identified and reported to Rocco upon delivery of the Product along with proper evidence of any such damage
- Products with original serial numbers that have been removed or altered or that cannot be readily determined
- Products for which any defective parts are not returned to Rocco for inspection (if requested by Rocco)
- Repair, removal or re-installation of inaccessible Products or component parts (e.g., when household fixtures interfere with Rocco’s ability to service, remove or replace the applicable Product or component part)
Signal issues related to Wi-Fi connectivity and camera performance
Repairs or replacements of light bulbs, railings, batteries, air filters, water filters or preservation solutions
Heavy commercial use (classified as opening and closing the Product’s door more than 30 times per day or more than 50,000 times over the life of the Product)
Products used outdoors or otherwise in an environment consistent with an outdoor environment, including temperatures below 55°F (13°C) or above 90°F (32°C) or humidity above 75%. Although this product meets the requirements of Climatic Category 5, 7, operation at an ambient temperature of 32°C or below and a relative humidity of 75% or below is recommended to maintain optimum reliability and prolong product life.
- Climate Class 5: This appliance is intended for use at an ambient temperature of 40℃ and a relative humidity of 40%
- Climate Class 7: This appliance is intended for use at an ambient temperature of 35℃ and a relative humidity of 75%
Used, refurbished, re-sold, showroom models or any other second-hand or non-original Products
GOVERNING LAW AND DISPUTE RESOLUTION: This Warranty shall be governed by and construed in accordance with the laws of the State of Delaware, without regard to its conflict of laws principles. Any dispute, controversy or claim arising out of or relating to this Warranty, or the breach, termination or invalidity thereof, shall be finally resolved by binding arbitration administered by the American Arbitration Association in accordance with its Consumer Arbitration Rules then in effect. The arbitration shall be conducted by a single arbitrator and shall take place in Wilmington, Delaware, or, at Rocco's sole discretion, remotely via videoconference. The arbitrator's award shall be final and binding and may be entered as a judgment in any court of competent jurisdiction. TO THE FULLEST EXTENT PERMITTED BY LAW, THE PURCHASER WAIVES ANY RIGHT TO PARTICIPATE IN A CLASS ACTION, CLASS ARBITRATION, OR OTHER REPRESENTATIVE PROCEEDING WITH RESPECT TO ANY CLAIM ARISING UNDER OR RELATING TO THIS WARRANTY. Some jurisdictions do not allow the waiver of class action rights, in which case this waiver may not apply to you.
SEVERABILITY: If any provision of this Warranty is held to be invalid, illegal or unenforceable by a court or arbitrator of competent jurisdiction, such invalidity, illegality or unenforceability shall not affect any other provision of this Warranty, and the remaining provisions shall continue in full force and effect. Any such invalid, illegal or unenforceable provision shall be deemed modified to the minimum extent necessary to make it valid, legal and enforceable while preserving the original intent of the parties.
ENTIRE WARRANTY: This Warranty constitutes the entire warranty provided by Rocco with respect to the Product and supersedes all prior or contemporaneous oral or written representations, statements, understandings or agreements relating to the warranty coverage of the Product. No dealer, agent, representative or employee of Rocco is authorized to make any modification, extension or addition to this Warranty. Any attempt to do so shall be void and unenforceable.
Please Note
Changes or modifications to this unit not expressly approved by the party responsible for compliance could void the user’s authority to operate the equipment.